Nail Art Tutorial: How to Use the Konad Nail Art Stamps

We love nail art like any other chick, but what we don't love is the time, effort and concentrated steady hand it requires. Enter in- the Konad nail stamping system!
Check out the fabulous results this kit gives:

While the designs may look like they've been done with the steady hand of a nail technician, they're actually done with stamps and by using the Konad plates. It takes minutes, clean up in minimal and you don't need a lot of technical skills.
Here is our 'Before' picture- we're using regular nail polishes as colour bases. On Alexandra (right- purple) is Essie in Bangle Jangle (US$8.00) and on Mandy (left- nude) is O.P.I. Don't Feed The Hand Models (C$12.00).

While Konad suggests using their brand of nail polish with the kit since it is thicker and has better lift off the plates, you can also use popular brands like O.P.I.- just avoid any thin polishes.
Tutorial:

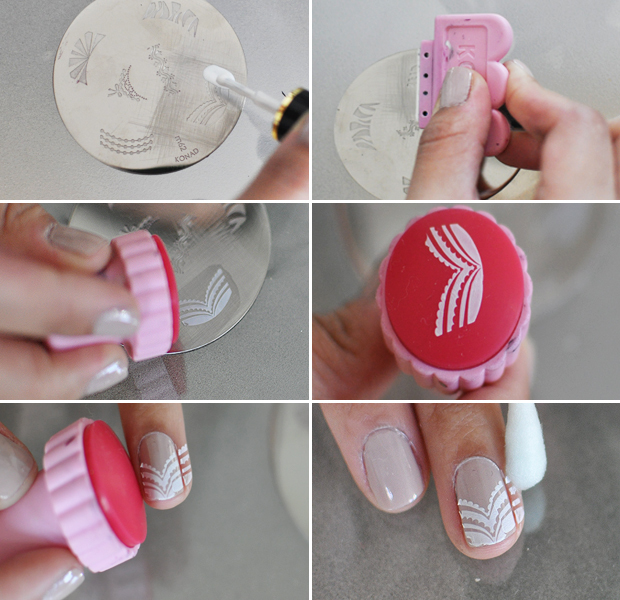
Once you've chosen your desired design, paint a small amount of polish over top. You only need to apply a small swatch of the polish- avoid too much paint.
Using the scraping tool like a squeegee, drag the polish across the entire design.
Before this dries, take the rubber stamping tool and press onto the design- roll it around a bit if you wish but this should pick up very easily.
Match up the bottom centre of your nail with the centre of the stamp, press down and roll from edge to edge. After releasing, you'll need to clean up the edges with some nail polish remover on a cotton swab.
This should dry fairly quickly- be sure to apply a top coat for protection!

Let your imagination run wild- apply multiple designs, try it out with different base colours or even attempt some fancy nail jewels!
Have you ever tried out this type of nail art?


